How to get started using your charger
Download and Install the Mobile App
We recommend installing the Hypervolt App, which enables you to control and monitor the charger. The app is free and can be downloaded from either the Google Play Store (Android) or App Store (Apple). Follow the instructions below to get set up for the first time.
![]()
Sign Up
You will need to create an account in order to control your charger(s) using the mobile app. You can use an Apple or Google account to sign in, or you can create a new username/password combination to use for your Hypervolt account.
If you have a preexisting account, select the Sign In option at the bottom of the screen and enter your account information to proceed.
Adopt Your Charger
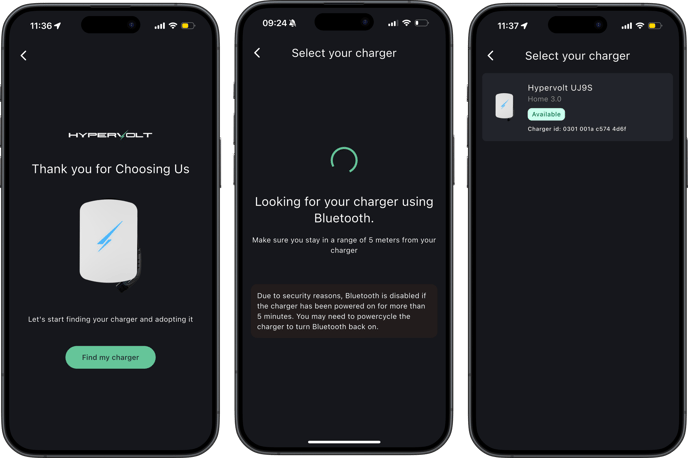
Once you have created your account, you’ll be prompted to find your charger and associate it with your Hypervolt account, also referred to as “adoption”.
You’ll need to make sure Bluetooth is enabled on your mobile device, and you have granted permission to the Hypervolt App to use a Bluetooth connection.

When searching for the charger, you'll see a notification that the mobile device is searching for a nearby charger. Once found, you’ll be prompted to select the available charger - simply click “adopt” to link your charger to your app.
Network Configuration
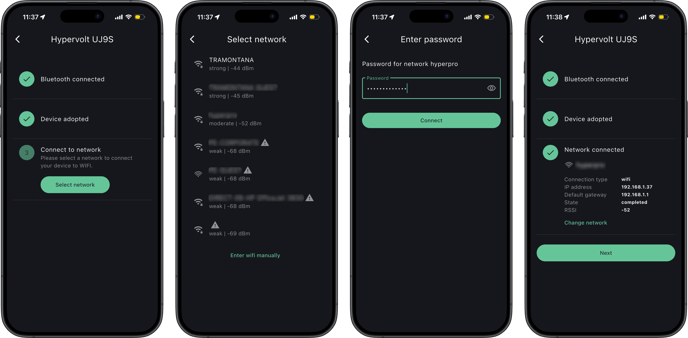
To use WiFi, you’ll need to use the initial Bluetooth configuration to set up the WiFi.
If you have a wired Ethernet connection to your charger, no configuration is required.
After Adopting, you’ll be presented with a list of nearby WiFi networks that the charger can see. Select the appropriate network and enter the password.

Insert your WiFi Password and press Next. Once connected you’ll be able to access your Hypervolt and its smart features from your phone regardless of your proximity to the charger.
Location Configuration
The below instructions apply to Hypervolt app version 5.5.0 or greater
Every Hypervolt charger has a unique location - the place where it's been physically mounted on a wall, column, charging post, or other suitable object. We configure this location as a part of the charger setup, and use it for storing site-specific information that won’t change unless the charger is physically moved to another location.

You’ll be prompted to name your location and set your timezone and currency. Be sure to configure these correctly, as this impacts your ability to create charging schedules and ensure that energy costs are calculated correctly. For more information on Location, please see Locations.
Home Battery Setup
There are several ways to configure your home battery system in the app:
- Option 1: Your installer can set this up during testing and commissioning using the installer app.
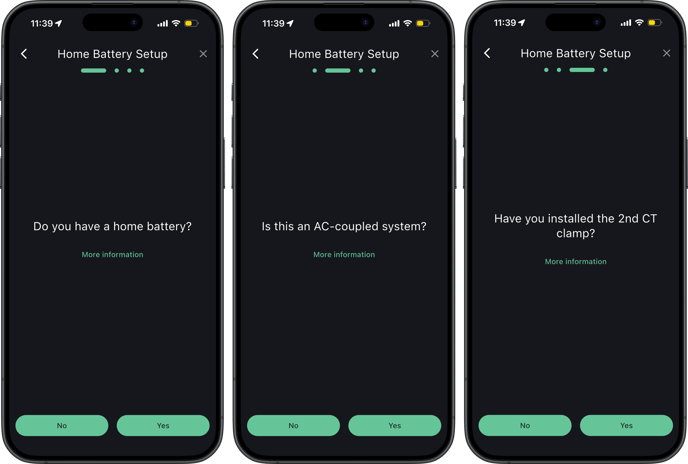
- Option 2: If self-commissioning, the setup workflow starts automatically when you first adopt your Hypervolt as shown on this page.

Alternatively, you can access the Home Battery Wizard anytime by going to Settings > Charger Settings > My Device > Location Settings > Home Battery System > Home Battery Wizard. For more information on the battery setup please see Home Battery System Setup.
Once your charger is adopted, connected to Wi-Fi, and both the location and home battery setup are complete, you’ll be able to view charger details on the home screen, set your charging schedule, and explore the rest of your settings.
